This is the first post of a few all related to getting started on AI yourself. When using AI a GPU very quickly will be something you want to incorporate in your setup. This means impacts though the way you configure everything regarding hardware and software. This example will assume that the physical server (with a GPU) is installed with proxmox and on that hypervisor a vm will be made to host docker.
Let’s start with proxmox. This is not too hard to install. There are plenty resources on the internet that guide you step by step to install proxmox. Once installed it’s time to get a virtual machine up and running with direct access to the graphics card.
Identifying the graphics card
The first thing we need is the physical address of the GPU. In this example I assume it’s an NVIDIA GTX 1630. When you are on the root shell of your proxmox host, type the following:
root@pve:~# lspci | grep -i nvidiaIn my case it returns the following:
43:00.0 VGA compatible controller: NVIDIA Corporation TU117 [GeForce GTX 1630] (rev a1)
43:00.1 Audio device: NVIDIA Corporation Device 10fa (rev a1)
The physical address of the GPU in this case is “43.00”. Let’s remember that one.
Creating the vm in Proxmox
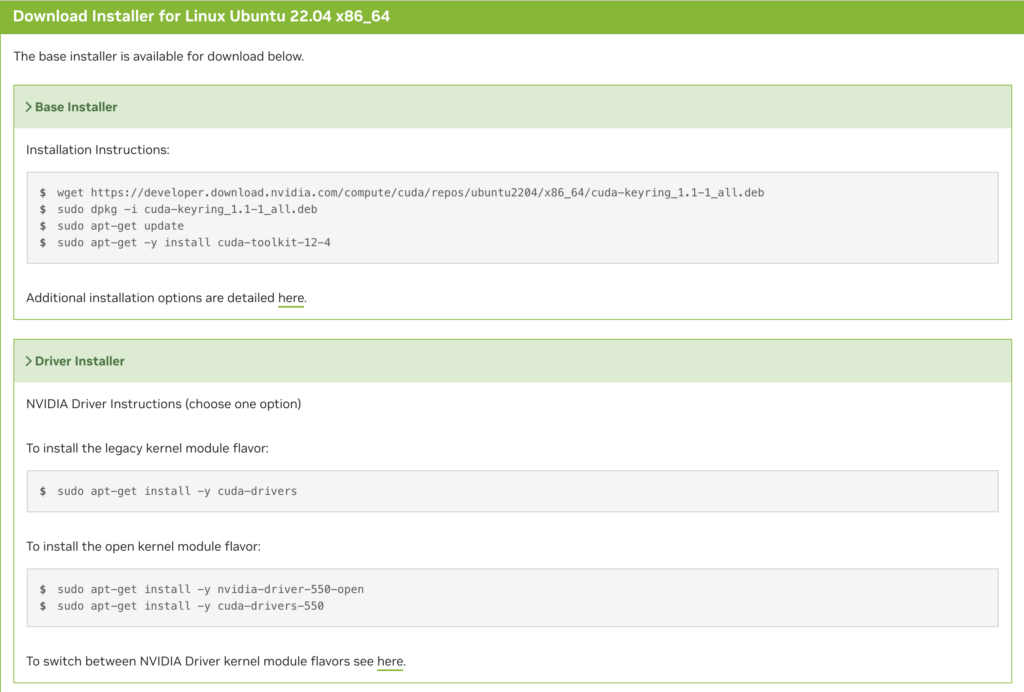
If you have a completely fresh install of proxmox, you will first need to install the installation media in order to create a VM. We need to take into account that in order to pass an NVIDIA card to your docker container you will need an OS that supports the NVIDIA CUDA toolkit. This resource can be found here. Please choose an OS that is supported by this toolkit. I will pick ubuntu and therefor will download the ubuntu server install media from here.
When you select one of your storage units on the left hand side, you should see that you will get an option on the right hand site to pick “ISO Images”. When you click on “ISO Images” you will find an upload button, that you can press and upload in this case the ubuntu server iso image to your proxmox server.
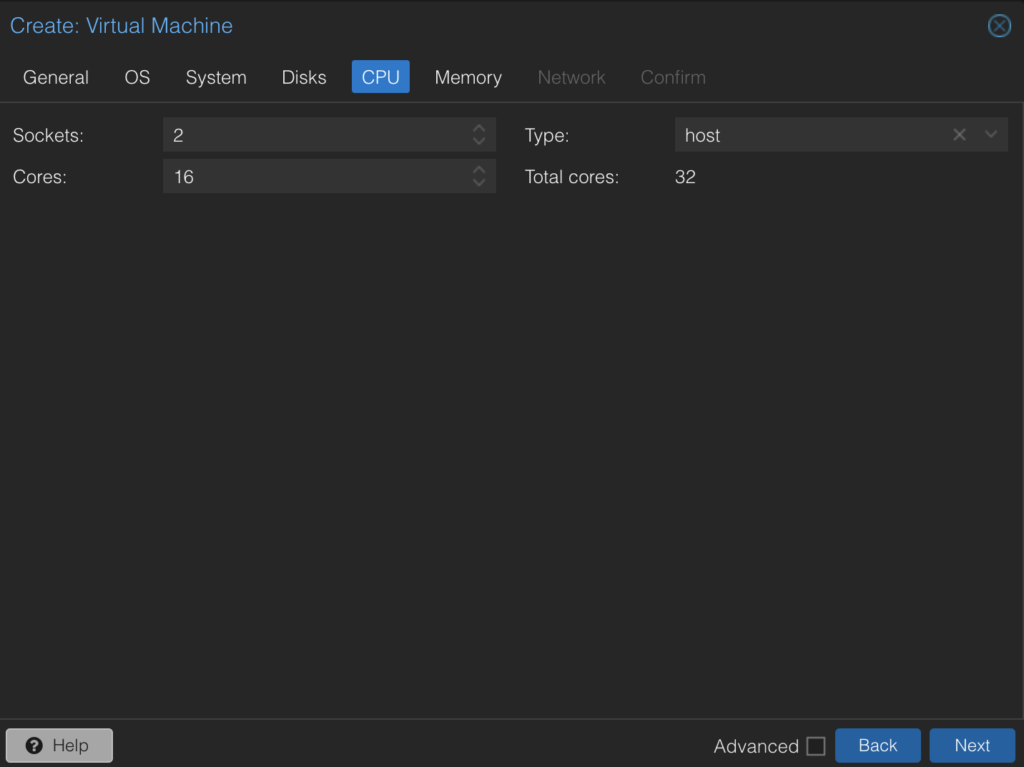
Once that is done we can create a new virtual machine by pressing on “Create VM” in the top right corner of your proxmox GUI. You will be greeted with a number of dialog boxes. Before filling everying out let me first list the specs I’m going to use. If you want to change something to your needs, you will be able to find where to change that setting.
- Memory: 60G
- Processors: 32 (2 sockets 16cores)[host]
- Harddisk 1: 200G
- Harddisk 2: 10Tb
A special note regarding the processor. When you are at the CPU tab, you can choose which type of CPU it should emulate. In order to get the most out of your server’s CPU capabilities, you should chose “host”.
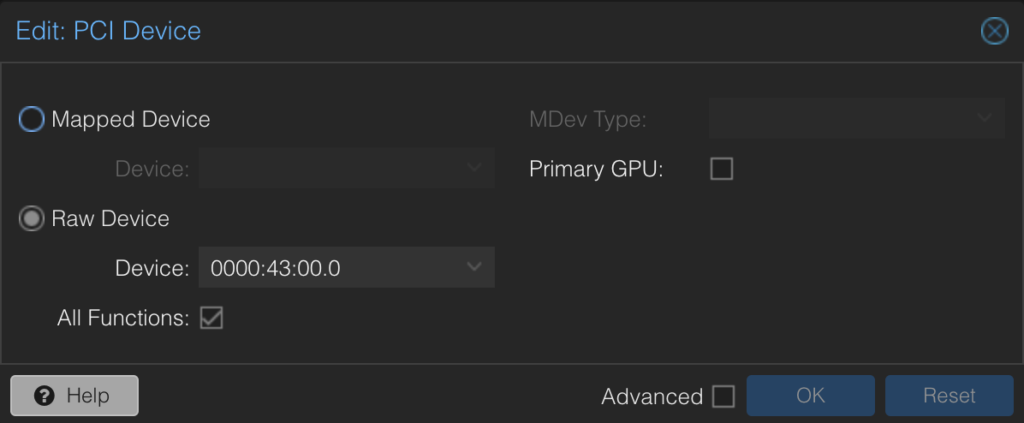
After you installed the OS on the virtual machine, it’s time to add the GPU. When you go to the Hardware section of your virtualmachine, you can press the button Add, which opens a pull down menu and there you can find “PCI Device”. You can fill in your hardware address of your GPU. You can select it from a pull down menu, but it’s good to verify that you have the right graphical card especially if you have multiple graphical cards in one server.
Don’t forget to install the NVIDIA toolkit, which I mentioned before.
In order to identify if the graphical card is usable by the virtual machine with the cuda toolkit. You can use the following command to check if the OS detects the graphical card “nvidia-smi”.
+---------------------------------------------------------------------------------------+
| NVIDIA-SMI 535.171.04             Driver Version: 535.171.04   CUDA Version: 12.2     |
|-----------------------------------------+----------------------+----------------------+
| GPU  Name                 Persistence-M | Bus-Id        Disp.A | Volatile Uncorr. ECC |
| Fan  Temp   Perf          Pwr:Usage/Cap |         Memory-Usage | GPU-Util  Compute M. |
|                                         |                      |               MIG M. |
|=========================================+======================+======================|
|   0  NVIDIA GeForce GTX 1630        Off | 00000000:00:10.0 Off |                  N/A |
| 35%   35C    P8              N/A /  75W |     50MiB /  4096MiB |      0%      Default |
|                                         |                      |                  N/A |
+-----------------------------------------+----------------------+----------------------+

+---------------------------------------------------------------------------------------+
| Processes:                                                                            |
|  GPU   GI   CI        PID   Type   Process name                            GPU Memory |
|        ID   ID                                                             Usage      |
|=======================================================================================|
|    0   N/A  N/A      1382      G   /usr/lib/xorg/Xorg                            4MiB |
|    0   N/A  N/A      2070    C+G   ...libexec/gnome-remote-desktop-daemon       41MiB |
+---------------------------------------------------------------------------------------+
Installing Docker
On the docker website there is an extensive description on how to install docker. I follow the procedure “Install using the apt repository“. And I generally skip the Hello World test.
The next thing I install is Portainer as I find it a very easy way to manage my docker containers. I do change it a little bit from the default install, because that large disk of 10Tb I claimed by creating the virtualmachine is assigned to my /storage directory. I want all persistent storage of my containers to live in /storage, to make it easy to manage and backup.
docker run -d -p 8000:8000 -p 9443:9443 --name portainer --restart=always -v /var/run/docker.sock:/var/run/docker.sock -v /storage/portainer:/data portainer/portainer-ce:latestIPvlan layer 2
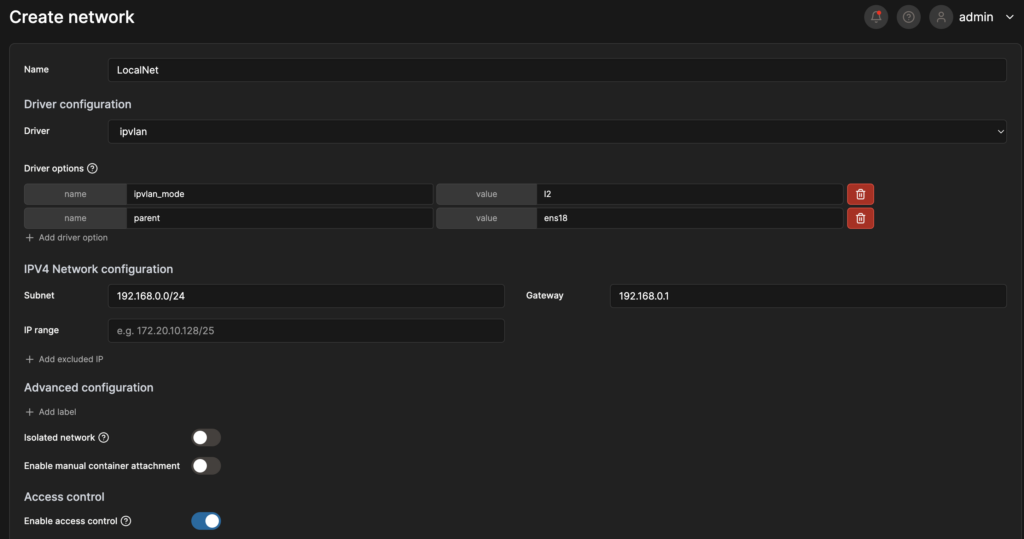
To make my work easier I prefer to have my containers reachable as hosts in the same network that my docker host is reachable on. You set this up once and after that you don’t have to worry in forwarding ports (like is done in the previous statement for portainer). Each container will have all the TCP and UDP ports available that they could ever need as each container will be uniquely addressable by it’s IP address. Let’s show it in a diagram.

In this exampe I use Jellyfin as the new container to add. In order for it to be reachable as the .10 of this home network, we need to create an ipvlan layer 2 in portainer. In order to do this you need the interface name of the network interface within the operating system that is running docker. In ubuntu you can find it by typing “ip a” and it will show you all your network interfacesnames with their mac-, IP address and a whole lot more information. In my case my interface name is ens18.
2: ens18: <BROADCAST,MULTICAST,UP,LOWER_UP> mtu 1500 qdisc fq_codel state UP group default qlen 1000
    link/ether bc:18:12:af:7f:2b brd ff:ff:ff:ff:ff:ff
    altname enp0s18
    inet 192.168.0.2/24 brd 192.168.0.255 scope global noprefixroute ens18
       valid_lft forever preferred_lft forever
    inet6 fe80::8ebb:f964:31f8:cd6a/64 scope link noprefixroute
       valid_lft forever preferred_lft forever
I can then go in Portainer to networks and create a new network, with the following setting.
Jellyfin
Before we can install Jellyfin and use the GPU, we need to find out how to identify the GPU within the virtual machine. As we already verified that nvidia-smi works. We can use the following command to get the GPU id: nvidia-smi –query-gpu=uuid –format=csv
# nvidia-smi --query-gpu=uuid --format=csv
uuid
GPU-94cf3d42-90a1-a4f2-ab0e-b8b3043925ab
With this information we now can start setting up the Jellyfin container. In Portainer if you go to stacks and click on add stack, you can give your stack a name and paste the following in the big textfield below.
version: "3"
services:
  media:
    image: lscr.io/linuxserver/jellyfin:latest
    runtime: nvidia # Expose NVIDIA GPUs
    container_name: jellyfin
    environment:
      - PUID=1000
      - PGID=1000
      - TZ=Europe/Amsterdam
      - JELLYFIN_PublishedServerUrl=192.168.0.10 #optional
    volumes:
      - /storage/jellyfin:/config
      - /storage/media:/data
      - /storage/media/transpose:/data/transpose
    networks:
      LocalNet:
        ipv4_address: '192.168.0.10'
    restart: unless-stopped
    deploy:
      resources:
        reservations:
          devices:
          - driver: nvidia
            device_ids: ['GPU-94cf3d42-90a1-a4f2-ab0e-b8b3043925ab']
            capabilities: ['compute','graphics','utility','video']

networks:
  LocalNet:
    external: true
If you click on deploy and you have configured everything correctly, the container should be deployed and your Jellyfin should be up and running. The default port for Jellyfin is 8096. In a future post I will add traefik as a reverse proxy to this compose file. Then you not neccessarily need to remember the tcp port and your jellyfin will have a valid certificate. But that is outside the scope of this post.
If we put some media in jellyfin and enable the GPU in the settings of Jellyfin, you should see an ffmpeg process in your nvidia-smi command, if the video needs on the fly transcoding:
+---------------------------------------------------------------------------------------+
| NVIDIA-SMI 535.171.04             Driver Version: 535.171.04   CUDA Version: 12.2     |
|-----------------------------------------+----------------------+----------------------+
| GPU  Name                 Persistence-M | Bus-Id        Disp.A | Volatile Uncorr. ECC |
| Fan  Temp   Perf          Pwr:Usage/Cap |         Memory-Usage | GPU-Util  Compute M. |
|                                         |                      |               MIG M. |
|=========================================+======================+======================|
|   0  NVIDIA GeForce GTX 1630        Off | 00000000:00:10.0 Off |                  N/A |
| 35%   37C    P2              N/A /  75W |    245MiB /  4096MiB |     21%      Default |
|                                         |                      |                  N/A |
+-----------------------------------------+----------------------+----------------------+

+---------------------------------------------------------------------------------------+
| Processes:                                                                            |
|  GPU   GI   CI        PID   Type   Process name                            GPU Memory |
|        ID   ID                                                             Usage      |
|=======================================================================================|
|    0   N/A  N/A      1382      G   /usr/lib/xorg/Xorg                            4MiB |
|    0   N/A  N/A      2070    C+G   ...libexec/gnome-remote-desktop-daemon       41MiB |
|    0   N/A  N/A    670345      C   /usr/lib/jellyfin-ffmpeg/ffmpeg             195MiB |
+---------------------------------------------------------------------------------------+